Are there certain lights in or outside of your home that when turned on, beget you to grovel and cover your eyes? A dimmer switch can make similar lighting more protean, creating a more comfortable home terrain for you and your family by allowing you to fine-tune the air, to your delight – and putting you back in control of when you need those sunglasses.
Installing a Dimmer Switch is Easy:
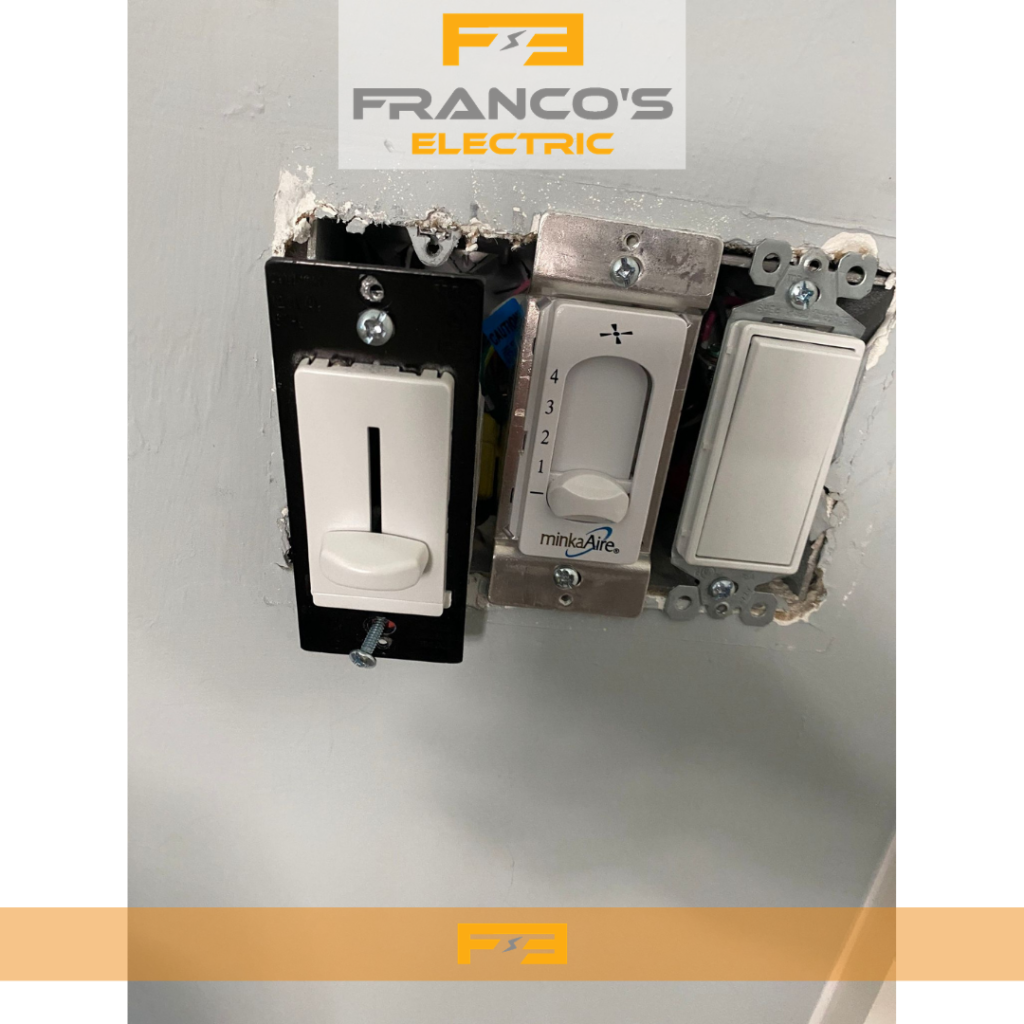
Installing a dimmer switch is easy, but like planning your geography lighting, requires a little bit of farsightedness. Before ejecting your current light switches, do your schoolwork. Not all bulbs can be bed-ridden, including numerous CFLs and LEDs – so be sure to check bulb boxes for specifications before copping. In addition, ceiling suckers bear special dimmer switches to help current oscillations from damaging the motor. Protect precisely!
How to Install a Dimmer Switch:
Gather Tools & Accouterments
● Line strippers
● Screwdriver
● Voltage sensor
● The correct dimmer switch for your operation
● Single or Three-Way (see below)
● Flashlight (in case of inadequate light)
Installation Steps:
- Cut power at the swell box( not the light switch). Also, use a voltage sensor to insure power has been cut before touching any cables.
- Wind and remove the switch plate cover and also the switch. Loosen the cables (generally wrapped around connector screws) – or simply crop off the ends with line strippers and remove the old switch, using line strippers to remove ¾- inch of containing from the end for reconnection.
- Always make sure you understand which part of the switch is top/ bottom, and where the cables go before hooking effects up.
● Green: Ground or copper wire.
● Black: Wires going to the dimmer (placed on the either gold screw).
Know Your Installation Type:
● Installation Steps for Standard/ Single Pole Dimmer Switches (Light is Turned On/Off
from Single position)
- Connect the green ground line to a green or exposed copper wire in the wall box, wringing ends together with a line connector nut.
- Connect each dimmer line( black) to the house cables separately. These could be black, white with black markings, or red. Strain the ends together with a line nut.
● Installation for Three-Way Dimmers (Light Can Be Turned On/Off from Multiple locales)
- Remove the ¾-inch covering from house cables with a line stripper. However, remove the crooked ends first, If the cables are fraudulent.
- Connect the green ground line to a green or exposed copper wire in the wall box, wringing ends together with a line connector nut.
- Connect the dimmer line (black) to your tagged common line, removing electrical tape recording as necessary.
- Connect the 2 remaining rubberneck cables, independently connecting each to the remaining cables in the wall box.
● Put Things Back Together
After the cables are attached, install the switch back into the electrical box, followed by the switch cover plate.
● Change Bulbs(s)
Flashback, not all bulbs are compatible with dimmer switches, so you’ll probably have to change out your old bulb before putting your new dimmer switch to use.
● Restore Power
Also have delightful playing with your new dimmable light!
Smart Installation Safety Practices:
- Ensure safety by tripping the circuit swell to the switch being replaced. However, you run the threat of getting zapped,( If you only turn the switch off.)
- Always circle the line around the screw, when possible, to avoid the wiring pulling loose over time. Loop the end into a ‘U’ pinch the ends together, and strain the screw.
- Don’t leave bare cables exposed. Trim ends and recap if necessary.